恺明大神 Mask R-CNN 超实用教程

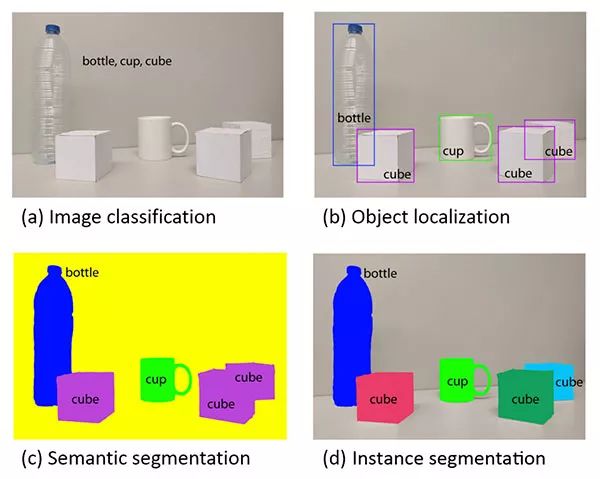
是否可以为图像中的每个对象生成一个MASK,从而允许我们从背景分割前景对象? 这样的方法可能吗?
每个目标边界框的坐标(x, y)
每个边界框关联的类别标签
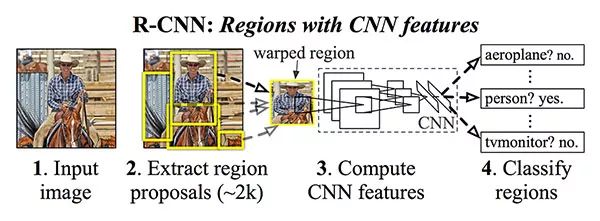
我们输入一个图像和对应的实际的边界框
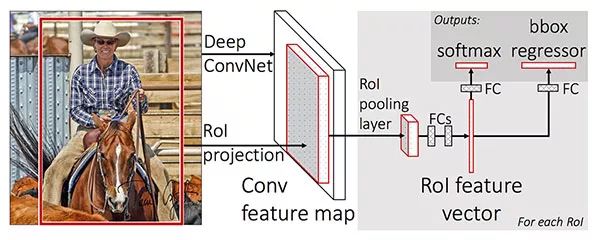
提取图像的特征map
应用ROI池化,得到ROI特征向量
最后, 使用两组全连接层来获得(1)类别标签预测(2)每个proposal的边框位置。

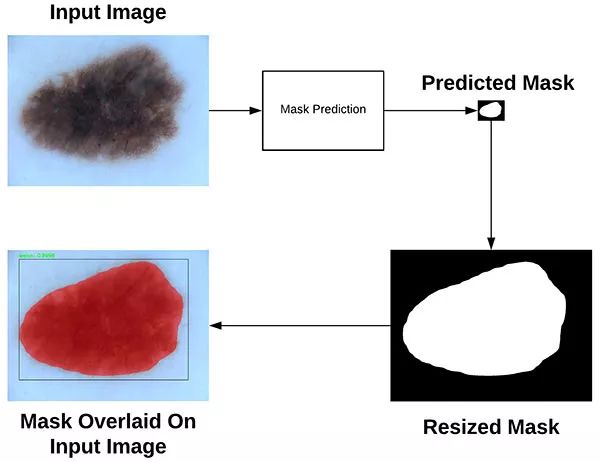
用更精确的ROI align模块替换ROI Pooling模块
从ROI align模块中插入一个额外的分支

类别标签预测
边界框预测
掩摸预测
由何等人发表的Mask R-CNN论文(https://arxiv.org/abs/1703.06870)
我的书, Deep Learning for Computer Vision with Python(https://www.pyimagesearch.com/deep-learning-computer-vision-python-book/),在这本书里,我将更详细地讨论Mask R-CNNs,包括如何根据自己的数据从零开始训练自己的Mask R-CNNs。
$ tree.├── mask-rcnn-coco│ ├── colors.txt│ ├── frozen_inference_graph.pb│ ├── mask_rcnn_inception_v2_coco_2018_01_28.pbtxt│ └── object_detection_classes_coco.txt├── images│ ├── example_01.jpg│ ├── example_02.jpg│ └── example_03.jpg├── videos│ ├──├── output│ ├──├── mask_rcnn.py└── mask_rcnn_video.py 4 directories, 9 files
mask-rcnn-coco/ : Mask R-CNN的模型文件。有四个文件:
frozen_inference_graph.pb : Mask R-CNN模型的权重文件,是基于COCO数据集上预训练的权重。
mask_rcnn_inception_v2_coco_2018_01_28.pbtxt : Mask R-CNN模型的配置文件。如果你想在你自己的标注的数据上建立并训练你自己的模型, 参考 Deep Learning for Computer Vision with Python(https://www.pyimagesearch.com/deep-learning-computer-vision-python-book/).
object_detection_classes_coco.txt : 所有90个类别都列在这个文本文件中,每行一个。在文本编辑器中打开它,查看模型可以识别哪些对象。
colors.txt : 这个文本文件包含六种颜色,可以随机分配给图像中检测到的目标。
images/ : 我在“Downloads”中提供了三个测试图像。请随意添加您自己的图像进行测试
videos/ : 这是一个空目录。实际上,我用从YouTube上搜集的大型视频进行了测试(Credits下面,就在“Summary”部分的上面)。我更倾向于建议您可以在YouTube上找到一些视频下载并测试,而不是提供一个真正大的zip文件。或者用你的手机拍一些视频,然后回到你的电脑前使用它们!
output/ :另一个空目录,将保存处理过的视频(假设您将命令行参数设置为输出到此目录)。
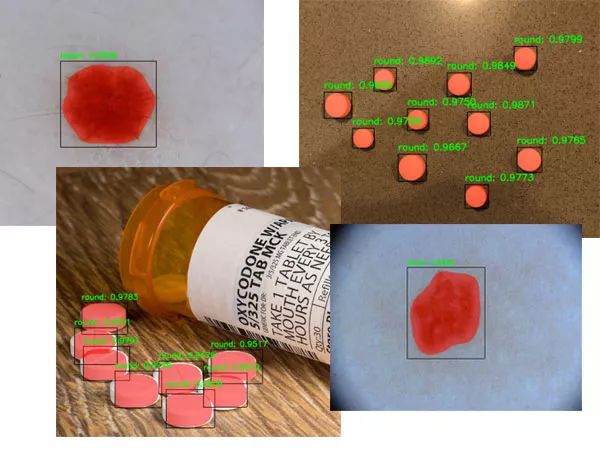
mask_rcnn.py : 这个脚本将执行实例分割并对图像应用一个掩码,这样您就可以看到Mask R-CNN检测出的对象在哪里,精细到像素。
mask_rcnn_video.py : 这个视频处理脚本使用相同的Mask R-CNN,并将模型应用于视频文件的每一帧。然后脚本将输出帧写回磁盘上的视频文件中。
# import the necessary packagesimport numpy as npimport argparseimport randomimport timeimport cv2import os
Mask R-CNN with OpenCV---Python# construct the argument parse and parse the argumentsap = argparse.ArgumentParser()ap.add_argument("-i", "--image", required=True,help="path to input image")ap.add_argument("-m", "--mask-rcnn", required=True,help="base path to mask-rcnn directory")ap.add_argument("-v", "--visualize", type=int, default=0,help="whether or not we are going to visualize each instance")ap.add_argument("-c", "--confidence", type=float, default=0.5,help="minimum probability to filter weak detections")ap.add_argument("-t", "--threshold", type=float, default=0.3,help="minimum threshold for pixel-wise mask segmentation")args = vars(ap.parse_args())
--image : 输入图像的路径。
--mask-rnn : Mask R-CNN文件的根路径 .
--visualize (可选): 正值表示想要可视化如何在屏幕上提取屏蔽区域。无论哪种方式,我们都将在屏幕上显示最终的输出。
--confidence (optional): 您可以选择0-0.5的概率值,该值用于过滤概率较低的检测区域。
--threshold (可选): 我们将为图像中的每个对象创建一个二进制掩码,这个阈值将帮助我们过滤掉概率较低的掩码。我发现默认值0.3时效果较好。
# load the COCO class labels our Mask R-CNN was trained onlabelsPath = os.path.sep.join([args["mask_rcnn"],"object_detection_classes_coco.txt"])LABELS = open(labelsPath).read().strip().split("")# load the set of colors that will be used when visualizing a given# instance segmentationcolorsPath = os.path.sep.join([args["mask_rcnn"], "colors.txt"])COLORS = open(colorsPath).read().strip().split("")COLORS = [np.array(c.split(",")).astype("int") for c in COLORS]COLORS = np.array(COLORS, dtype="uint8")
# derive the paths to the Mask R-CNN weights and model configurationweightsPath = os.path.sep.join([args["mask_rcnn"],"frozen_inference_graph.pb"])configPath = os.path.sep.join([args["mask_rcnn"],"mask_rcnn_inception_v2_coco_2018_01_28.pbtxt"])# load our Mask R-CNN trained on the COCO dataset (90 classes)# from diskprint("[INFO] loading Mask R-CNN from disk...")net = cv2.dnn.readNetFromTensorflow(weightsPath, configPath)
# load our input image and grab its spatial dimensionsimage = cv2.imread(args["image"])(H, W) = image.shape[:2]# construct a blob from the input image and then perform a forward# pass of the Mask R-CNN, giving us (1) the bounding box coordinates# of the objects in the image along with (2) the pixel-wise segmentation# for each specific objectblob = cv2.dnn.blobFromImage(image, swapRB=True, crop=False)net.setInput(blob)start = time.time()(boxes, masks) = net.forward(["detection_out_final", "detection_masks"])end = time.time()# show timing information and volume information on Mask R-CNNprint("[INFO] Mask R-CNN took {:.6f} seconds".format(end - start))print("[INFO] boxes shape: {}".format(boxes.shape))print("[INFO] masks shape: {}".
Load the input image and extract dimensions for scaling purposes later (Lines 47 and 48).
Construct a blob via cv2.dnn.blobFromImage (Line 54). You can learn why and how to use this function in my previous tutorial(https://www.pyimagesearch.com/2017/11/06/deep-learning-opencvs-blobfromimage-works/).
Perform a forward pass of the blob through the net while collecting timestamps (Lines 55-58). The results are contained in two important variables: boxes and masks .
# loop over the number of detected objectsfor i in range(0, boxes.shape[2]):# extract the class ID of the detection along with the confidence# (i.e., probability) associated with the predictionclassID = int(boxes[0, 0, i, 1])confidence = boxes[0, 0, i, 2]# filter out weak predictions by ensuring the detected probability# is greater than the minimum probabilityif confidence > args["confidence"]:# clone our original image so we can draw on itclone = image.copy()# scale the bounding box coordinates back relative to the# size of the image and then compute the width and the height# of the bounding boxbox = boxes[0, 0, i, 3:7] * np.array([W, H, W, H])(startX, startY, endX, endY) = box.astype("int")boxW = endX - startXboxH = endY - startY
# extract the pixel-wise segmentation for the object, resize# the mask such that it s the same dimensions of the bounding# box, and then finally threshold to create a *binary* maskmask = masks[i, classID]mask = cv2.resize(mask, (boxW, boxH),interpolation=cv2.INTER_NEAREST)mask = (mask > args["threshold"])# extract the ROI of the imageroi = clone[startY:endY, startX:endX]
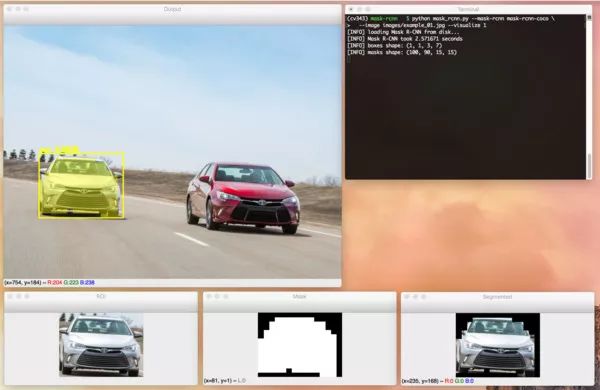
# check to see if are going to visualize how to extract the# masked region itselfif args["visualize"] > 0:# convert the mask from a boolean to an integer mask with# to values: 0 or 255, then apply the maskvisMask = (mask * 255).astype("uint8")instance = cv2.bitwise_and(roi, roi, mask=visMask)# show the extracted ROI, the mask, along with the# segmented instancecv2.imshow("ROI", roi)cv2.imshow("Mask", visMask)cv2.imshow("Segmented", instance)
检查是否应该可视化ROI、掩模和分割实例(第99行)。
将掩模从布尔值转换为整数,其中值“0”表示背景,“255”表示前景(第102行)。
执行按位掩模以仅仅可视化分割实例本身(第103行)。
显示三个结果图像(第107-109行)。
# now, extract *only* the masked region of the ROI by passing# in the boolean mask array as our slice conditionroi = roi[mask]# randomly select a color that will be used to visualize this# particular instance segmentation then create a transparent# overlay by blending the randomly selected color with the ROIcolor = random.choice(COLORS)blended = ((0.4 * color) + (0.6 * roi)).astype("uint8")# store the blended ROI in the original imageclone[startY:endY, startX:endX][mask] = blended
# draw the bounding box of the instance on the imagecolor = [int(c) for c in color]cv2.rectangle(clone, (startX, startY), (endX, endY), color, 2)# draw the predicted label and associated probability of the# instance segmentation on the imagetext = "{}: {:.4f}".format(LABELS[classID], confidence)cv2.putText(clone, text, (startX, startY - 5),cv2.FONT_HERSHEY_SIMPLEX, 0.5, color, 2)# show the output imagecv2.imshow("Output", clone)cv2.waitKey(0)
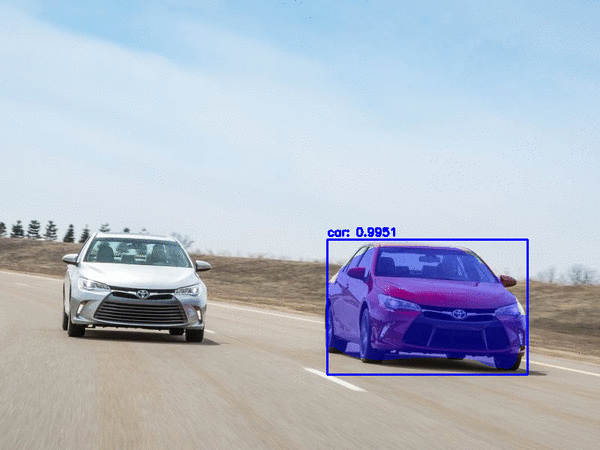
$ python mask_rcnn.py --mask-rcnn mask-rcnn-coco --image images/example_01.jpg[] loading Mask R-CNN from disk...[] Mask R-CNN took 0.761193 seconds[] boxes shape: (1, 1, 3, 7)[] masks shape: (100, 90, 15, 15)
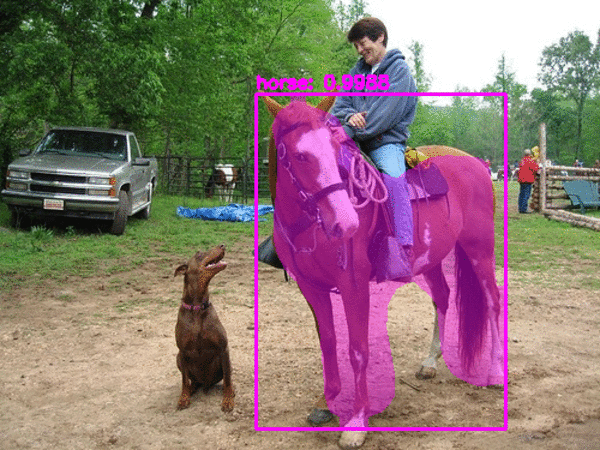
$ python mask_rcnn.py --mask-rcnn mask-rcnn-coco --image images/example_02.jpg--confidence 0.6[] loading Mask R-CNN from disk...[] Mask R-CNN took 0.676008 seconds[] boxes shape: (1, 1, 8, 7)[] masks shape: (100, 90, 15, 15)
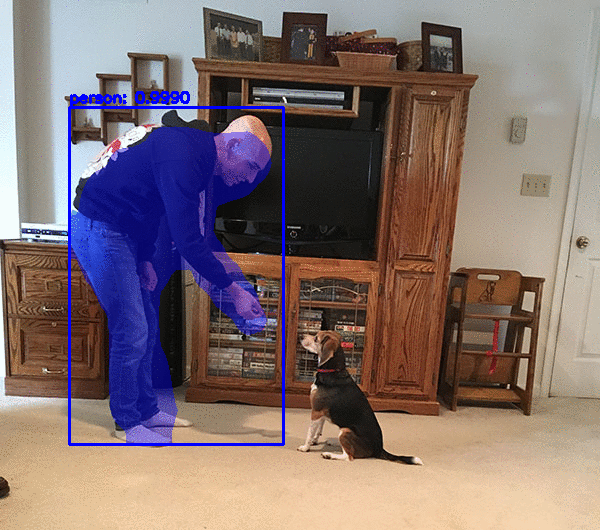
$ python mask_rcnn.py --mask-rcnn mask-rcnn-coco --image images/example_03.jpg[] loading Mask R-CNN from disk...[] Mask R-CNN took 0.680739 seconds[] boxes shape: (1, 1, 3, 7)[] masks shape: (100, 90, 15, 15)
# import the necessary packagesimport numpy as npimport argparseimport imutilsimport timeimport cv2import os# construct the argument parse and parse the argumentsap = argparse.ArgumentParser()ap.add_argument("-i", "--input", required=True,help="path to input video file")ap.add_argument("-o", "--output", required=True,help="path to output video file")ap.add_argument("-m", "--mask-rcnn", required=True,help="base path to mask-rcnn directory")ap.add_argument("-c", "--confidence", type=float, default=0.5,help="minimum probability to filter weak detections")ap.add_argument("-t", "--threshold", type=float, default=0.3,help="minimum threshold for pixel-wise mask segmentation")args = vars(ap.parse_args())
# load the COCO class labels our Mask R-CNN was trained onlabelsPath = os.path.sep.join([args["mask_rcnn"],"object_detection_classes_coco.txt"])LABELS = open(labelsPath).read().strip().split("")# initialize a list of colors to represent each possible class labelnp.random.seed(42)COLORS = np.random.randint(0, 255, size=(len(LABELS), 3),dtype="uint8")# derive the paths to the Mask R-CNN weights and model configurationweightsPath = os.path.sep.join([args["mask_rcnn"],"frozen_inference_graph.pb"])configPath = os.path.sep.join([args["mask_rcnn"],"mask_rcnn_inception_v2_coco_2018_01_28.pbtxt"])# load our Mask R-CNN trained on the COCO dataset (90 classes)# from diskprint("[INFO] loading Mask R-CNN from disk...")net = cv2.dnn.readNetFromTensorflow(weightsPath, configPath)
# initialize the video stream and pointer to output video filevs = cv2.VideoCapture(args["input"])writer = None# try to determine the total number of frames in the video filetry:prop = cv2.cv.CV_CAP_PROP_FRAME_COUNT if imutils.is_cv2()else cv2.CAP_PROP_FRAME_COUNTtotal = int(vs.get(prop))print("[INFO] {} total frames in video".format(total))# an error occurred while trying to determine the total# number of frames in the video fileexcept:print("[INFO] could not determine # of frames in video")total = -1
# loop over frames from the video file streamwhile True:# read the next frame from the file(grabbed, frame) = vs.read()# if the frame was not grabbed, then we have reached the end# of the streamif not grabbed:break# construct a blob from the input frame and then perform a# forward pass of the Mask R-CNN, giving us (1) the bounding box# coordinates of the objects in the image along with (2) the# pixel-wise segmentation for each specific objectblob = cv2.dnn.blobFromImage(frame, swapRB=True, crop=False)net.setInput(blob)start = time.time()(boxes, masks) = net.forward(["detection_out_final","detection_masks"])end = time.time()
# loop over the number of detected objectsfor i in range(0, boxes.shape[2]):# extract the class ID of the detection along with the# confidence (i.e., probability) associated with the# predictionclassID = int(boxes[0, 0, i, 1])confidence = boxes[0, 0, i, 2]# filter out weak predictions by ensuring the detected# probability is greater than the minimum probabilityif confidence > args["confidence"]:# scale the bounding box coordinates back relative to the# size of the frame and then compute the width and the# height of the bounding box(H, W) = frame.shape[:2]box = boxes[0, 0, i, 3:7] * np.array([W, H, W, H])(startX, startY, endX, endY) = box.astype("int")boxW = endX - startXboxH = endY - startY# extract the pixel-wise segmentation for the object,# resize the mask such that it s the same dimensions of# the bounding box, and then finally threshold to create# a *binary* maskmask = masks[i, classID]mask = cv2.resize(mask, (boxW, boxH),interpolation=cv2.INTER_NEAREST)mask = (mask > args["threshold"])# extract the ROI of the image but *only* extracted the# masked region of the ROIroi = frame[startY:endY, sta
# grab the color used to visualize this particular class,# then create a transparent overlay by blending the color# with the ROIcolor = COLORS[classID]blended = ((0.4 * color) + (0.6 * roi)).astype("uint8")# store the blended ROI in the original frameframe[startY:endY, startX:endX][mask] = blended# draw the bounding box of the instance on the framecolor = [int(c) for c in color]cv2.rectangle(frame, (startX, startY), (endX, endY),color, 2)# draw the predicted label and associated probability of# the instance segmentation on the frametext = "{}: {:.4f}".format(LABELS[classID], confidence)cv2.putText(frame, text, (startX, startY - 5),cv2.FONT_HERSHEY_SIMPLEX, 0.5, col
# check if the video writer is Noneif writer is None:# initialize our video writerfourcc = cv2.VideoWriter_fourcc(*"MJPG")writer = cv2.VideoWriter(args["output"], fourcc, 30,(frame.shape[1], frame.shape[0]), True)# some information on processing single frameif total > 0:elap = (end - start)print("[INFO] single frame took {:.4f} seconds".format(elap))print("[INFO] estimated total time to finish: {:.4f}".format(elap * total))# write the output frame to diskwriter.write(frame)# release the file pointersprint("[INFO] cleaning up...")writer.release()vs.release()
$ python mask_rcnn_video.py --input videos/cats_and_dogs.mp4--output output/cats_and_dogs_output.avi --mask-rcnn mask-rcnn-coco[] loading Mask R-CNN from disk...[] 19312 total frames in video[] single frame took 0.8585 seconds[] estimated total time to finish: 16579.2047
$ python mask_rcnn_video.py --input videos/slip_and_slide.mp4--output output/slip_and_slide_output.avi --mask-rcnn mask-rcnn-coco[] loading Mask R-CNN from disk...[] 17421 total frames in video[] single frame took 0.9341 seconds[] estimated total time to finish: 16272.9920
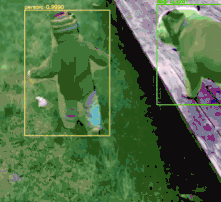
猫狗:
“Try Not To Laugh Challenge – Funny Cat & Dog Vines compilation 2017”on YouTube(https://www.youtube.com/watch?v=EtH9Yllzjcc)
“Happy rock” on BenSound(https://www.bensound.com/royalty-free-music/track/happy-rock)
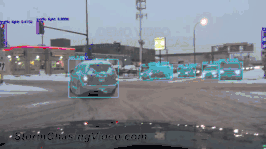
Slip and Slide:
“Compilation of Ridiculous Car Crash and Slip & Slide Winter Weather – Part 1” on YouTube(https://www.youtube.com/watch?v=i59v0p-gAtk)
“Epic” on BenSound(https://www.bensound.com/royalty-free-music/track/epic)
我教你如何训练一个Mask R-CNN自动检测和分割癌性皮肤病变影像-第一步,建立一个自动癌症危险因素分类系统。
为您提供我最喜欢的图像标注工具,使您能够为输入图像创建蒙版。
向您展示如何在自定义数据集上训练 Mask R-CNN。
在训练自己的 Mask R-CNN 时,为您提供我的最佳实践、提示和建议。
总结

 扫一扫下载订阅号助手,用手机发文章
朋友会在“发现-看一看”看到你“在看”的内容