专栏 | 深度学习算法优化系列六 | 使用TensorFlow-Lite对LeNet进行训练时量化
以下文章来源于GiantPandaCV ,作者BBuf
GiantPandaCV由专注于技术的两位95后创建,专注于机器学习、深度学习、计算机视觉、图像处理等领域,希望在传播知识、分享知识的同时能够启发你(・ω<)☆


本文来自 @BBuf 的社区专栏 GiantPandaCV,文末扫码即可订阅专栏。
前言
在深度学习算法优化系列三 | Google CVPR2018 int8量化算法 这篇推文中已经详细介绍了Google提出的Min-Max量化方式,关于原理这一小节就不再赘述了,感兴趣的去看一下那篇推文即可。昨天已经使用tflite测试了训练后量化,所以今天主要来看一下训练时量化时怎么做的。注意训练中的量化实际上是伪量化,伪量化是完全量化的第一步,它只是模拟了量化的过程,并没有实现量化,只是在训练过程中添加了伪量化节点,计算过程还是用float32计算。然后训练得出.pb文件,放到指令TFLiteConverter里去实现第二步完整的量化,最后生成tflite模型,实现int8计算。
环境配置
tensorflow 1.31.1 python3.5
代码实战
导入一些需要用到的头文件。
#coding=utf-8
import re
import time
import numpy as np
import tensorflow as tf
import tensorflow.contrib.slim as slim
from tensorflow.contrib.slim import get_variables_to_restore
from tensorflow.python.framework import graph_util
import tensorflow.examples.tutorials.mnist.input_data as input_data
设置一些超参数,分别为dropout层的丢弃比率,学习率,批量大小,模型需要保存的路径以及训练的迭代次数。
# 参数设置
KEEP_PROB = 0.5
LEARNING_RATE = 1e-5
BATCH_SIZE = 30
PARAMETER_FILE = "./checkpoint/variable.ckpt-100000"
MAX_ITER = 100000
构建我们的训练网络,这里使用LeNet,想使用其他网络或者自己的网络相应修改即可。注意一下这里使用了tensorflow中的变量重用函数,方便的控制在测试阶段不使用Dropout。关于Lenet可以详细的看一下我之前的推文,地址如下:卷积神经网络学习路线(六)| 经典网络回顾之LeNet 同时在LeNet类中已经定义好损失函数和优化器。在训练中引入量化的操作要复杂一些,首先训练时在损失计算后面,优化器定义前面需要引入tf.contrib.quantize.create_training_graph()。代码如下:其中tf.contrib.quantize.create_training_graph()函数中的80000代表程序迭代到8w次之后才开始做量化,原理在深度学习算法优化系列三中讲了。因为这里要训练10w次,所以后2w次会做训练时的伪两家
# Build LeNet
class Lenet:
    def __init__(self, is_train=True):
        self.raw_input_image = tf.placeholder(tf.float32, [None, 784], "inputs")
        self.input_images = tf.reshape(self.raw_input_image, [-1, 28, 28, 1])
        self.raw_input_label = tf.placeholder("float", [None, 10], "labels")
        self.input_labels = tf.cast(self.raw_input_label, tf.int32)
        self.dropout = KEEP_PROB
        self.is_train = is_train

        with tf.variable_scope("Lenet") as scope:
            self.train_digits = self.build(True)
            scope.reuse_variables()
            self.pred_digits = self.build(False)

        self.loss = slim.losses.softmax_cross_entropy(self.train_digits, self.input_labels)
        # 获取当前的计算图,用于后续的量化
        self.g = tf.get_default_graph()

        if self.is_train:
            # 在损失函数之后,优化器定义之前,在这里会自动选择计算图中的一些operation和activation做伪量化
            tf.contrib.quantize.create_training_graph(self.g, 80000)
            self.lr = LEARNING_RATE
            self.train_op = tf.train.AdamOptimizer(self.lr).minimize(self.loss)
        else:
            # 用于预测时,将之前训练时构造的伪量化的operation和activation实际量化,用于后续的推断
            tf.contrib.quantize.create_eval_graph(self.g)
        self.predictions = tf.arg_max(self.pred_digits, 1, name="predictions")
        self.correct_prediction = tf.equal(tf.argmax(self.pred_digits, 1), tf.argmax(self.input_labels, 1))
        self.train_accuracy = tf.reduce_mean(tf.cast(self.correct_prediction, "float"))

    def build(self, is_trained=True):
        with slim.arg_scope([slim.conv2d], padding='VALID',
                            weights_initializer=tf.truncated_normal_initializer(stddev=0.01),
                            weights_regularizer=slim.l2_regularizer(0.0005)):
            net = slim.conv2d(self.input_images, 6, [5, 5], 1, padding='SAME', scope='conv1')
            net = slim.max_pool2d(net, [2, 2], scope='pool2')
            net = slim.conv2d(net, 16, [5, 5], 1, scope='conv3')
            net = slim.max_pool2d(net, [2, 2], scope='pool4')
            net = slim.conv2d(net, 120, [5, 5], 1, scope='conv5')
            net = slim.flatten(net, scope='flat6')
            net = slim.fully_connected(net, 84, scope='fc7')
            net = slim.dropout(net, self.dropout, is_training=is_trained, scope='dropout8')
            digits = slim.fully_connected(net, 10, scope='fc9')
        return digits
开始训练LeNet的模型,代码如下:
def train():
    mnist = input_data.read_data_sets("MNIST_data/", one_hot=True)
    test_images = mnist.test.images
    test_labels = mnist.test.labels
    sess = tf.Session()
    batch_size = BATCH_SIZE
    paramter_path = PARAMETER_FILE
    max_iter = MAX_ITER

    lenet = Lenet()
    variables = get_variables_to_restore()
    save_vars = [variable for variable in variables if not re.search("Adam", variable.name)]

    saver = tf.train.Saver(save_vars)
    sess.run(tf.initialize_all_variables())
    # 用来显示标量信息
    tf.summary.scalar("loss", lenet.loss)
    # merge_all 可以将所有summary全部保存到磁盘,以便tensorboard显示。如果没有特殊要求,
    # 一般用这一句就可一显示训练时的各种信息了。
    summary_op = tf.summary.merge_all()
    # 指定一个文件用来保存图
    train_summary_writer = tf.summary.FileWriter("logs", sess.graph)

    for i in range(max_iter):
        batch = mnist.train.next_batch(batch_size)
        if i % 100 == 0:
            train_accuracy, summary = sess.run([lenet.train_accuracy, summary_op], feed_dict={
                lenet.raw_input_image: batch[0],
                lenet.raw_input_label: batch[1]
            })
            train_summary_writer.add_summary(summary)
            print("step %d, training accuracy %g" % (i, train_accuracy))

        if i % 500 == 0:
            test_accuracy = sess.run(lenet.train_accuracy, feed_dict={lenet.raw_input_image: test_images,
                                                                      lenet.raw_input_label: test_labels})
            print("\n")
            print("step %d, test accuracy %g" % (i, test_accuracy))
            print("\n")
        sess.run(lenet.train_op, feed_dict={lenet.raw_input_image: batch[0],
                                            lenet.raw_input_label: batch[1]})
    saver.save(sess, paramter_path)
    print("saved model")
训练完成之后我们会得到checkpoint模型文件: 接下来我们需要将
checkpoint模型文件转换成freeze pb文件,当然保存为saved_model模型也是可以的,因为昨天介绍过了保存为saved_model然后转换为tflite模型,所以今天介绍这种新的也是更加常用的转换方式。将checkpoint模型保存为pb模型的代码如下:
# 将存储了伪量化信息的freeze pb文件转换成完全量化的tflite文件,可以看见量化完之后文件内存基本减小到1/4
def convert_to_tflite():
converter = tf.lite.TFLiteConverter.from_frozen_graph("pb_model/freeze_eval_graph.pb", ["inputs"], ["predictions"])
converter.inference_type = tf.lite.constants.QUANTIZED_UINT8
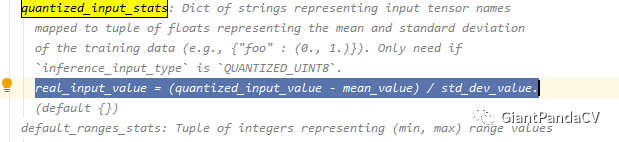
converter.quantized_input_stats = {"inputs":(0., 1.)} # mean, std_dev,需要自己从训练集(增强后,输入网络之前的)统计出来
converter.allow_custom_ops = True
converter.default_ranges_stats = (0, 255)
converter.post_training_quantize = True
tflite_model = converter.convert()
open("tflite_model/eval_graph.tflite", "wb").write(tflite_model)
这样就会在tflite_model文件夹下生成eval_graph.tflite模型了。
 注意下面几点:
["inputs"], ["predictions"]是freeze pb中的输入节点和输出节点。quantized_input_states是定义输入的均值和方差,tensorflow lite的文档中说这个mean和var的计算方式是:mean是0到255之间的整数值,映射到浮点数0.0f。std_dev = 255 /(float_max - float_min。按照文档的默认数值效果也还行,这里只是为了展示整个量化过程就不再仔细的去推敲mean和stddev的取值了,这里用默认值来做。default_ranges_states是指量化后的值的范围,其中255就是2^8 - 1。官方文档如下: 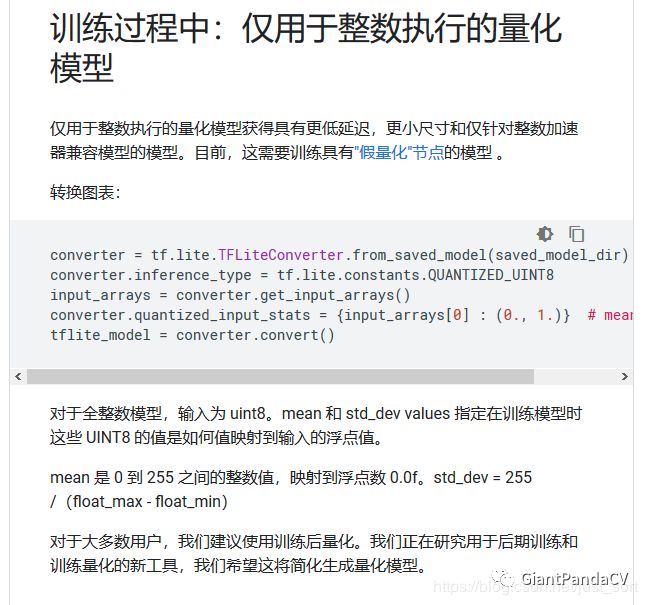 同时跟进这个函数可以发现:
 可以大概算出来
mean和stddev取[0,1]是满足这个关系的。
接下来我们写3个测试函数来测试一下原始的checkpoint模型,pb模型和tflite模型的表现。代码如下:
# 使用原始的checkpoint进行预测
def origin_predict():
    mnist = input_data.read_data_sets("MNIST_data/", one_hot=True)
    sess = tf.Session()
    saver = tf.train.import_meta_graph("./checkpoint/variable.ckpt-100000.meta")
    saver.restore(sess, "./checkpoint/variable.ckpt-100000")

    input_node = sess.graph.get_tensor_by_name('inputs:0')
    pred = sess.graph.get_tensor_by_name('predictions:0')
    labels = [label.index(1) for label in mnist.test.labels.tolist()]
    predictions = []
    start_time = time.time()
    for i in range(10):
        for image in mnist.test.images:
            prediction = sess.run(pred, feed_dict={input_node: [image]}).tolist()[0]
            predictions.append(prediction)
    end_time = time.time()
    correct = 0
    for prediction, label in zip(predictions, labels):
        if prediction == label:
            correct += 1
    print(correct / len(labels))
    print((end_time - start_time))
    sess.close()

# 使用freeze pb文件进行预测
def freeze_pb_predict():
    mnist = input_data.read_data_sets('MNIST_data/', one_hot=True)
    with tf.Session() as sess:
        with tf.gfile.FastGFile("pb_model/freeze_eval_graph.pb", 'rb') as f:
            # 使用tf.GraphDef()定义一个空Graph
            graph_def = tf.GraphDef()
            graph_def.ParseFromString(f.read())
            # 返回一个上下文管理器,使得这个Graph对象成为当前默认的graph.当你想在一个进程里面创建
            # 多个图的时候,就应该使用这个函数.为了方便起见,一个全局的图对象被默认提供,要是你没有
            # 显式创建一个新的图的话,所有的操作(ops)都会被添加到这个默认的图里面来.
            #sess.graph.as_default()
            # 导入Graph
            tf.import_graph_def(graph_def, name='')
            # tf.global_variables_initializer()添加节点用于初始化所有的变量(GraphKeys.VARIABLES)。
            # 返回一个初始化所有全局变量的操作(Op)。在你构建完整个模型并在会话中加载模型后,运行这个节点。
            sess.run(tf.global_variables_initializer())
            # 获取输出Tensor和输出Tensor
            input_node = sess.graph.get_tensor_by_name('inputs:0')
            pred = sess.graph.get_tensor_by_name('predictions:0')

            labels = [label.index(1) for label in mnist.test.labels.tolist()]
            predictions = []
            start_time = time.time()
            for image in mnist.test.images:
                prediction = sess.run(pred, feed_dict={input_node: [image]}).tolist()[0]
                predictions.append(prediction)
            end_time = time.time()
            correct = 0
            for prediction, label in zip(predictions, labels):
                if prediction == label:
                    correct += 1
            print(correct / len(labels))
            print((end_time - start_time))

# 使用tflite进行预测
def tflite_predict():
    mnist = input_data.read_data_sets("MNIST_data/", one_hot=True)
    labels = [label.index(1) for label in mnist.test.labels.tolist()]
    images = mnist.test.images
    images = np.array(images, dtype="uint8")
    # 根据tflite文件生成解析器
    interpreter = tf.contrib.lite.Interpreter(model_path="./tflite_model/eval_graph.tflite")
    # 用allocate_tensors()分配内存
    interpreter.allocate_tensors()
    # 获取输入输出tensor
    input_details = interpreter.get_input_details()
    output_details = interpreter.get_output_details()

    predictions = []
    start_time = time.time()
    for i in range(10):
        for image in images:
            # 填充输入tensor
            interpreter.set_tensor(input_details[0]['index'], [image])
            # 前向推理
            interpreter.invoke()
            # 获取输出tensor
            score = interpreter.get_tensor(output_details[0]['index'])[0][0]
            # # 结果去掉无用的维度
            # result = np.squeeze(score)
            # #print('result:{}'.format(result))
            # # 输出结果是长度为10(对应0-9)的一维数据,最大值的下标就是预测的数字
            predictions.append(score)
    end_time = time.time()
    correct = 0
    for prediction, label in zip(predictions, labels):
        if prediction == label:
            correct += 1
    print((end_time - start_time))
    print(correct / len(labels))
这里值得注意的问题是,测试其中一个模型的时候我们需要注释掉另外两个,因为我发现在tensorflow-1.13.1中一个使用同一个py文件启动了2个Session的话,第二个Session执行的内容会出问题,当然我使用第一个Session之后是确认关闭了的,所以我认为这可能是一个BUG。我的源码也放github了,有兴趣的话可以帮忙看看是不是我代码的问题。
测试结果
| 类型 | 模型大小 | 测试集精度 | 推理测试集10轮的时间 |
|---|---|---|---|
| 原始模型 | 242KB | 97.52% | 110.72 |
| pb模型 | 242KB | 97.52% | 114.00 |
| 量化后的模型 | 67KB | 94.00% | 56.77 |
我在测试的时候模型掉了大约四个点,我们可以大概想一下为什么这里精度掉得还是比较多,可能对于Mnist数据集来说LeNet已经算是一个大模型了,所以训练后量化比训练时量化表现更好。并且这个模型再训练10w轮,量化后模型的精度可以降低到2个百分点。
总结
这两天测试了一下TFite的int8量化,可以看出来量化确实是有效果的,并且tflite也确实可以实现加速,况且这是在pc端的测试,放到设备端加速应该会更明显吧。
附录
Tensorflow-Lite官方文档:https://tensorflow.google.cn/lite Tensorflow后量化官方实例:https://github.com/tensorflow/tensorflow/blob/d035a83459330c87bbc527e3d480b65f32841997/tensorflow/contrib/lite/tutorials/post_training_quant.ipynb 我的github地址:https://github.com/BBuf/model_quantization


AI 研习社专栏旨在满足有持续创作能力的的知名学者、技术专家、优秀博主、讲师和人工智能人才文字创作和打造专属个人IP的需求。AI 研习社希望能够帮助大咖见证求知,分享洞见~
欢迎大家来AI研习社订阅/开通专栏:https://www.yanxishe.com/column


 点击 阅读原文,查看专栏更多内容